كيفية استعادة الملفات المحذوفة نهائيًا من سلة المهملات في نظام التشغيل Windows
برنامج مجاني لاستعادة الملفات المحذوفة
Recovery Toolbox File Undelete Free
يمكن لبرنامج Recovery Toolbox File Undelete Free استعادة الملفات المحذوفة مؤقتًا من سلة المحذوفات في نظام التشغيل Windows.
كيفية استعادة الملف المحذوف
كيفية استرداد ملف محذوف نهائيًا في نظام التشغيل Windows. شرح خطوة بخطوة لاستعادة الملفات المحذوفة من سلة المهملات المحذوفة:
- قم بتنزيل وتثبيت وتشغيل Recovery Toolbox File Undelete Free من هنا: https://recoverytoolbox-ar.com/download/FileUndeleteFreeSetup.exe
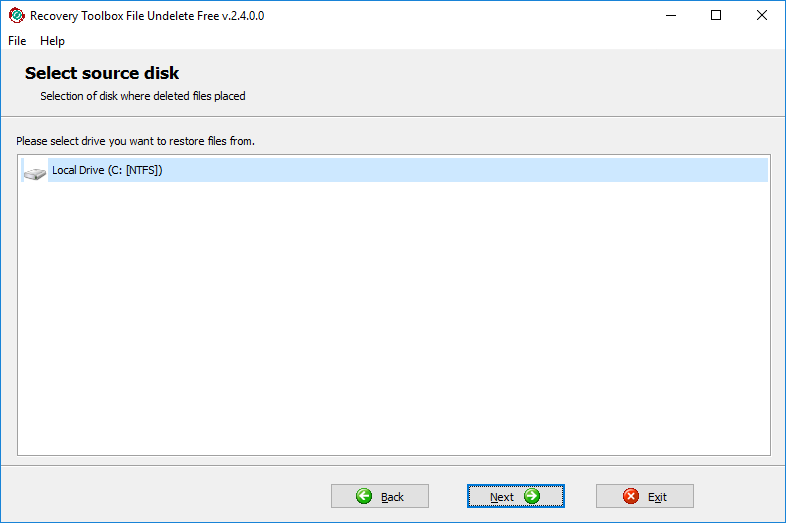
- حدد القرص الذي تم وضع الملفات المحذوفة عليه
- حدد الملفات/المجلدات التي تريد استردادها
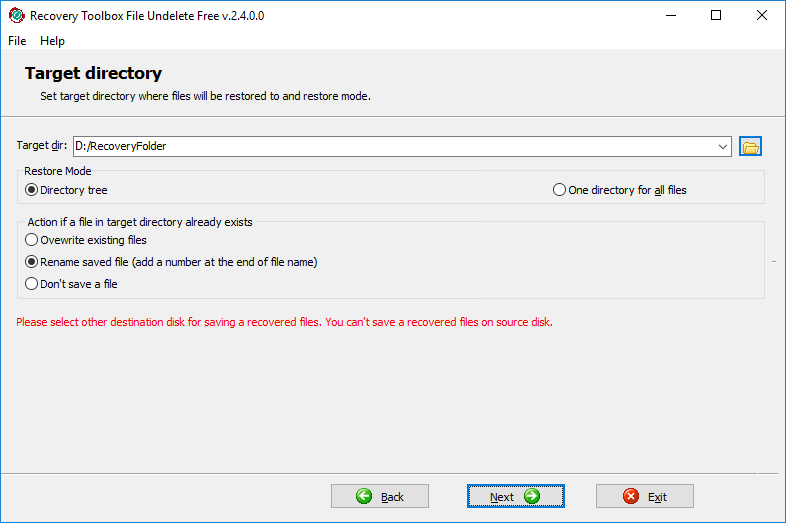
- حدد موقع الإخراج ووضع الاستعادة وخيارات الاسترداد الأخرى
أداة مجانية لاستعادة الملفات المحذوفة في نظام التشغيل Windows
سيساعدك برنامج Recovery Toolbox File Undelete Free على استعادة الملفات المحذوفة من سلة المحذوفات في نظام Windows.
إذا قمت عن غير قصد بمسح سلة المهملات ووجدت أنها تحتوي على ملف مهم، فسيقوم برنامج Recovery Toolbox File Undelete Free بفحص القرص الصلب الداخلي أو الخارجي بالكامل الذي يحتوي على الملف ثم محاولة استعادته. يعمل البرنامج فقط مع محركات الأقراص التي تستخدم نظام الملفات NTFS. يتيح لك نظام الملفات NTFS حفظ أكثر من 32 جيجابايت من البيانات على محرك أقراص واحد.
لإلغاء إزالة الملف، سيحتاج البرنامج إلى إجراء فحص كامل للقرص وتحليله لتحديد إمكانية استعادة الملف المحذوف.
في بعض الحالات، قد يكون استرداد الملف مستحيلاً لأسباب مختلفة، مثل ما يلي:
- يتم استخدام كتل القرص التي تم تخزين الملفات المحذوفة فيها بواسطة ملف آخر؛
- تم تغيير السجلات في جدول تخصيص الملفات (FAT) بشكل كبير؛
- تم تثبيت أقراص عالية الأداء، مثل SSD، على النظام.
مزايا برنامج Recovery Toolbox File Undelete Free:
- مجاني الاستخدام
- بسيط، مع واجهة بديهية
- أداء عالي للقرص
إذا كنت تريد استعادة الملفات المحذوفة، فيجب عليك القيام بما يلي:
- حدد القرص الذي يحتوي على الملفات المراد استعادتها
- ابدأ فحص القرص وإجراء التحليل
- حدد الملف الذي تريد استعادته
انتبه: قد يتم إنشاء اسم الملف والامتداد تلقائيًا بواسطة البرنامج، نظرًا لأنه قد لا يتم استعادة اسم الملف الأصلي ونوعه بشكل صحيح.
- حدد مسار الوجهة للملفات المستعادة
المتطلبات:
- Windows 98/Me/2000/XP/Vista/7/8/10/11 أو Windows Server 2003/2008/2012/2016 وما فوق
- يجب أن يبدأ البرنامج بحقوق المسؤول.
انتبه: من المهم جدًا أن يكون القرص الوجهة مختلفًا عن القرص المصدر الذي يتم استرداد البيانات منه. بعبارة أخرى، لا يُنصح بحفظ الملفات المستعادة على نفس القرص. استخدم محركات الأقراص القابلة للإزالة أو وحدات التخزين الشبكية لحفظ الإصدارات المستعادة من الملفات التي تم حذفها مسبقًا.
لقطات الشاشة:
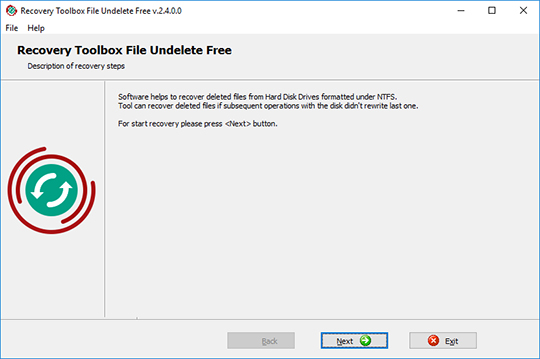
شاشة الترحيب
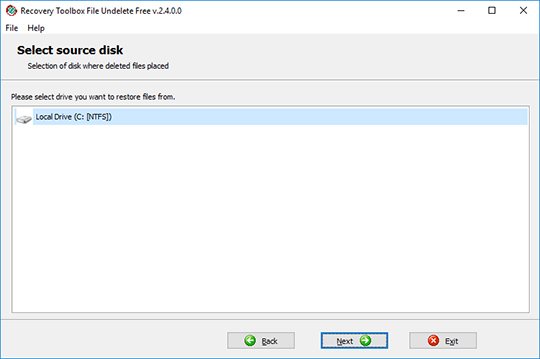
اختيار القرص المصدر
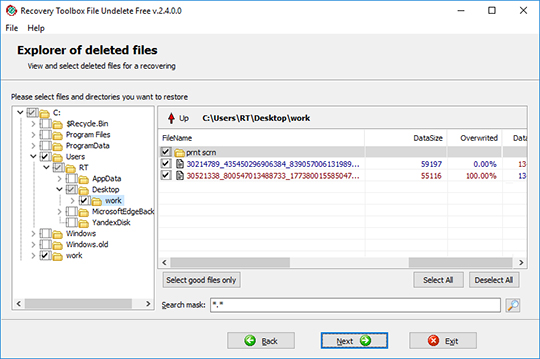
اختيار الملف والمجلد
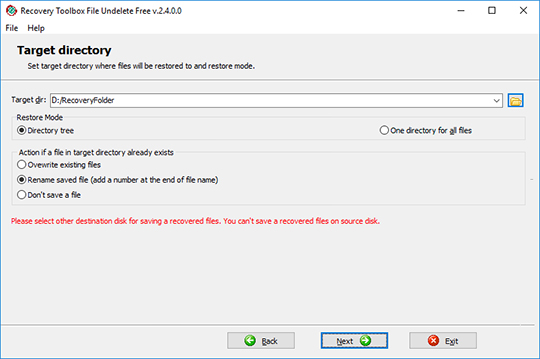
اختيار موقع الإخراج ووضع الاستعادة وخيارات الاستعادة الأخرى
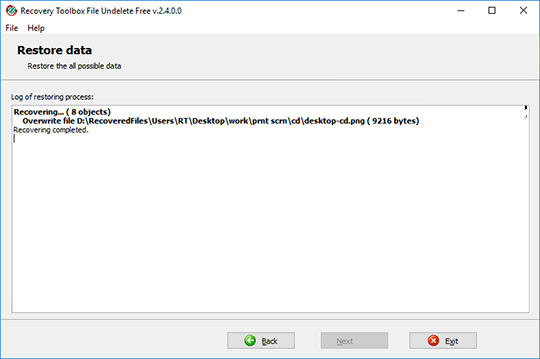
تقرير ما بعد الاسترداد
كيف يعمل:
تنزيل البرنامج من الموقع. تنزيل
تثبيت البرنامج:
- انقر نقرًا مزدوجًا فوق ملف التثبيت الذي تم تنزيله في المتصفح

- حدد ملف التثبيت الذي تم تنزيله في مستكشف Windows وانقر فوق Enter أو انقر نقرًا مزدوجًا فوقه.
يرجى تأكيد رسالة التحذير:
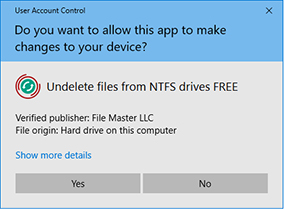
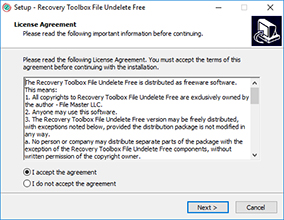
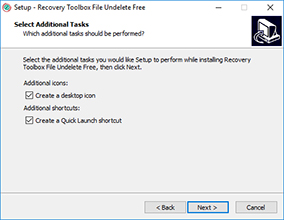
تشغيل معالج التثبيت:
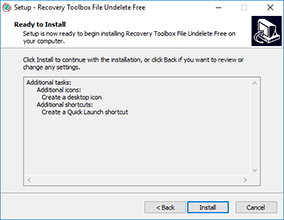
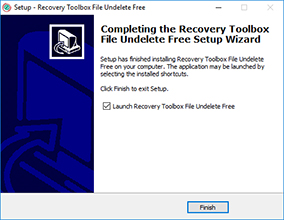
تشغيل البرنامج:
- انقر نقرًا مزدوجًا فوق الرمز الموجود على سطح المكتب
أو
- اختر من القائمة الرئيسية: Start | Programs | Recovery Toolbox File Undelete Free | Recovery Toolbox File Undelete Free
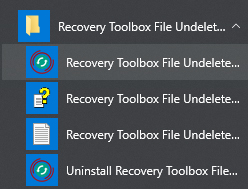
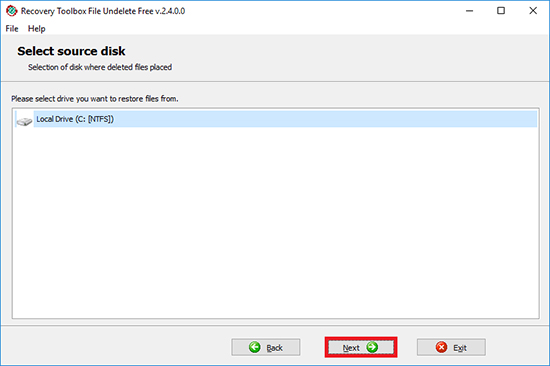
حدد القرص الذي تم وضع الملفات المحذوفة عليه:

وانقر على زر Next:
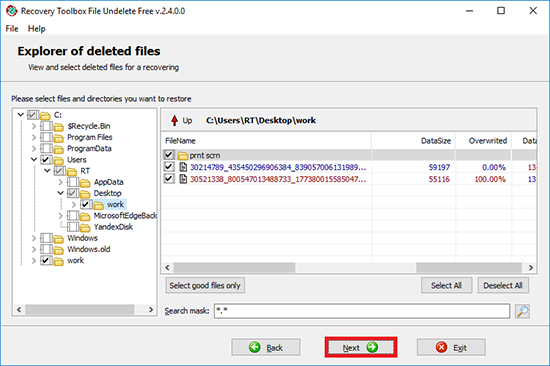
حدد الملفات/المجلدات التي تريد استردادها:

انقر فوق الزر Next:
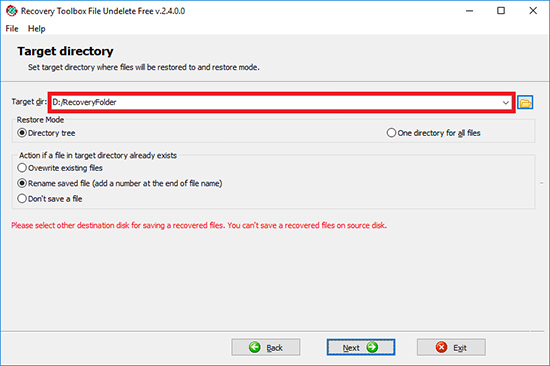
حدد موقع الإخراج ووضع الاستعادة وخيارات الاسترداد الأخرى:
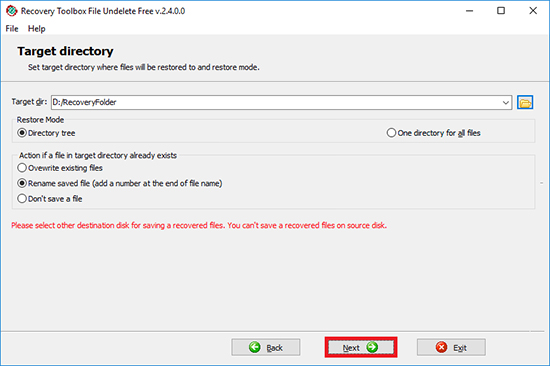
اضغط على زر Next:
فيديو:
المساعدة عبر الإنترنت:
Recovery Toolbox File Undelete Free (تنزيل) هي أداة استرداد مجانية صغيرة الحجم وموثوقة وسهلة الاستخدام. ومع ذلك، قد يواجه بعض المستخدمين، وخاصة أولئك الذين ليسوا على دراية كبيرة ببرامج الاسترداد واسترداد البيانات بشكل عام، مشاكل في استخدام البرنامج وقد يكون لديهم أسئلة. لذلك، قمنا بإنشاء دليل الاستخدام هذا الذي يتناول كل جانب من جوانب تشغيل البرنامج وينبغي أن يجيب على أي أسئلة قد تكون لديك. يرجى قراءة هذا المستند قبل الاتصال بقسم دعم العملاء لدينا.
استعادة الملفات والمجلدات المحذوفة
يتميز برنامج Recovery Toolbox File Undelete Free بواجهة سهلة الاستخدام تعتمد على معالج لا يتطلب سوى الحد الأدنى من مشاركتك في العملية. تنقسم عملية الاسترداد نفسها إلى عدة خطوات مميزة، كل منها تطالبك بمعلومات أو إجراء محدد. كل ما عليك فعله لاستعادة ملفاتك بنجاح هو قراءة التعليمات التي تظهر على الشاشة، وإدخال المعلومات الضرورية أو تنفيذ الإجراء المطلوب، ثم النقر فوق الزر Next في النهاية للانتقال إلى الخطوة التالية من العملية. يرجى ملاحظة أنه يجب بدء تشغيل البرنامج بحقوق المسؤول ليعمل بشكل صحيح.
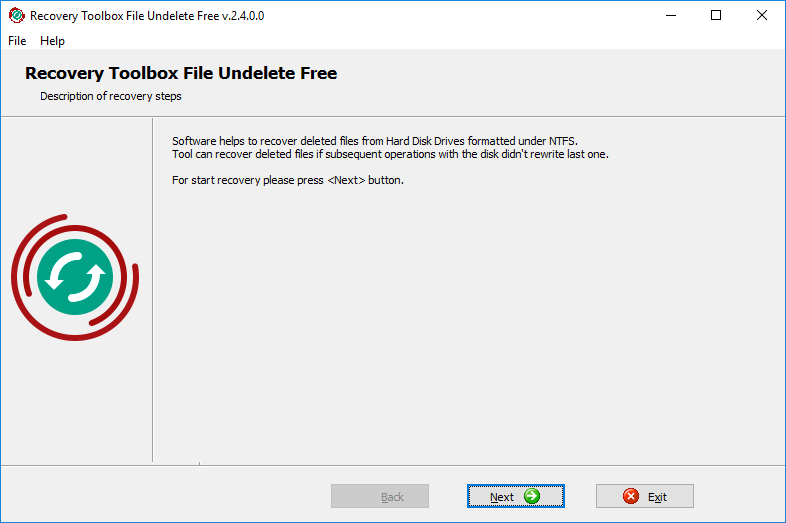
1. حدد محرك الأقراص الذي تريد استرداد البيانات منه
هذه هي شاشة بدء تشغيل البرنامج التي تحتوي على رسالة ترحيب وتطالبك بالنقر فوق Next للمتابعة في عملية الاسترداد. يرجى القيام بذلك وسيتم نقلك إلى الخطوة الثانية.
في هذه الخطوة، ستحتاج إلى تحديد القرص المطلوب من قائمة محركات الأقراص المنسقة بنظام NTFS التي تم اكتشافها في نظامك. ما عليك سوى اختيار حرف محرك الأقراص المطلوب من القائمة والنقر فوق Next. سيبدأ البرنامج في فحص محرك الأقراص بحثًا عن الملفات والمجلدات المحذوفة. وكقاعدة عامة، تستغرق هذه العملية بضع ثوانٍ، ولكنها قد تستغرق وقتًا أطول في حالتك، اعتمادًا على حجم محرك الأقراص وبنيته. بمجرد الانتهاء، سيفتح البرنامج تلقائيًا الشاشة التالية لمعالج الاسترداد.
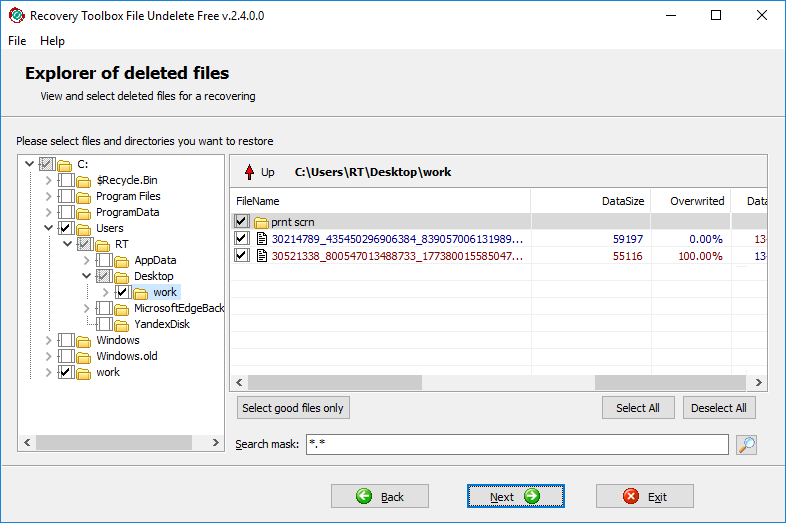
3. اختيار الملفات والمجلدات المراد استردادها
هذه هي الشاشة الرئيسية للمعالج التي تمكنك من تصفح الملفات والمجلدات المحذوفة ووضع علامة عليها لاستعادتها. إذا لم تكن متأكدًا من موقع ملف معين، فيمكنك استخدام وظيفة البحث المضمنة التي تدعم أيضًا أقنعة البحث (استخدم علامة النجمة (*) لاستبدال أي تسلسل من الأحرف في اسم الملف أو امتداده).
تنقسم شاشة معالج الاسترداد هذه إلى منطقتين وظيفيتين. يحتوي الجزء الأيسر من النافذة على شجرة مجلدات تتيح لك تصفح المجلدات المحذوفة على محرك الأقراص المحدد. يتم عرض محتويات كل مجلد في جدول في الجزء الأيمن من الشاشة يعرض أيضًا خصائص الملف المهمة. يمكنك الانتقال بسرعة إلى مستوى أعلى بالنقر فوق سهم أحمر أعلى هذا الجدول.
يعرض الجدول قائمة بالملفات المحذوفة في المجلد المحدد حاليًا وخصائصها: الحجم بالبايتات، وعلامة زمنية للحذف، وسماتها، والأهم من ذلك، الدرجة التي تم بها الكتابة فوق منطقة القرص الصلب التي كانت تخزن الملف سابقًا. إذا تم الكتابة فوق ملف، فسيكون الاسترداد مستحيلًا. لتسريع الأمور، يمكنك استخدام الزر Select good files only أسفل الجدول لتحديد الملفات التي يمكن استعادتها بسرعة بدرجة عالية من اليقين. تتيح لك الأزرار Select all وDeselect all على اليمين تحديد جميع الملفات أو إسقاط التحديد على التوالي. يمكن الوصول إلى نفس الوظائف من خلال قائمة منبثقة يتم فتحها بالنقر بزر الماوس الأيمن في أي مكان داخل الجدول.
بمجرد تحديد الملفات التي تريد استردادها، انقر فوق الزر Next في أسفل النافذة للمتابعة إلى الخطوة التالية.
في هذه المرحلة من عملية الاسترداد، ستحتاج إلى تحديد الموقع الذي سيتم فيه استعادة الملفات التي حددتها. ويمكن القيام بذلك بإحدى الطرق التالية. لتحديد مجلد الإخراج، اكتب اسمه ومساره في حقل الإدخال الموجود أعلى نافذة البرنامج أو استخدم مربع حوار فتح الملف القياسي في نظام التشغيل Windows بالنقر فوق الزر المقابل على يمين الحقل. يمكنك أيضًا تحديد أحد المواقع المستخدمة سابقًا من القائمة المنسدلة التي يمكن فتحها بالنقر فوق زر صغير به سهم متجه للأسفل في الجزء الأيمن من حقل الإدخال.
ستحتاج أيضًا إلى تعيين معلمة وضع الاستعادة. اختر Directory tree إذا كنت تريد أن يعيد البرنامج إنشاء بنية المجلد الأصلية في الموقع المحدد أو One directory for all files إذا كنت تريد أن يقوم Recovery Toolbox File Undelete Free باستعادة جميع الملفات المحددة إلى مجلد واحد من اختيارك.
أخيرًا، حدد الإجراء الذي سيتم اتخاذه إذا تم العثور على ملف بنفس الاسم في موقع الإخراج المحدد. يمكن للبرنامج إما استبدال الملف القديم، أو إعادة تسمية الملف الجديد بإضافة رقم إلى اسمه، أو تخطي عملية استرداد هذا الملف تمامًا.
بمجرد تعيين كل هذه المعلمات، انقر فوق الزر Next للمتابعة إلى الخطوة الأخيرة من عملية الاسترداد.
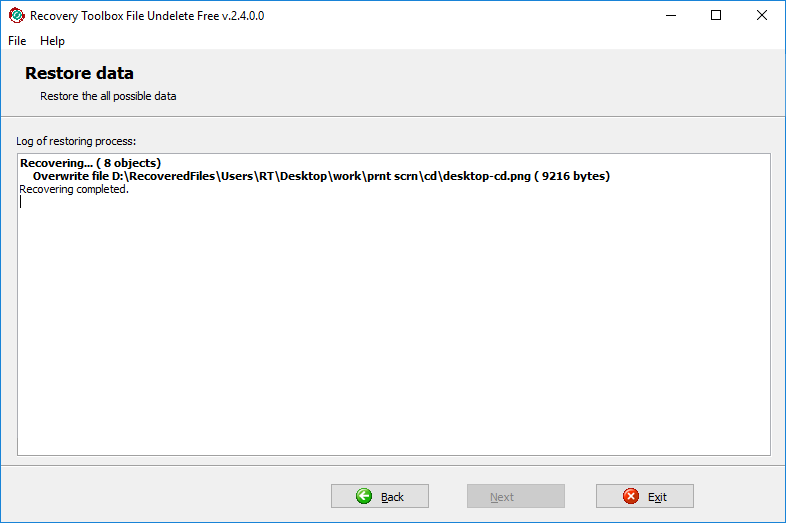
هذه هي الشاشة النهائية للمعالج التي تحتوي على سجل للإجراءات التي تم تنفيذها وملخصًا موجزًا لجلسة الاسترداد هذه: عدد الكائنات المستردة وحجمها وما إلى ذلك. في هذه المرحلة، يمكنك إما إغلاق البرنامج بالنقر فوق Exit أو استخدام زر Back للعودة إلى المرحلة السابقة وتكرار الاسترداد باستخدام معلمات مختلفة. يمكنك أيضًا النقر فوق Back حتى الشاشة الأولى لاستعادة ملف جديد أو مجموعة من الملفات.
كما ترى، فإن برنامج Recovery Toolbox File Undelete Free سهل الاستخدام للغاية. إذا كانت لديك أي أسئلة أو مشكلات مع البرنامج، فلا تتردد في الاتصال بقسم الدعم لدينا - سنكون سعداء بمساعدتك.
الموارد:
- NTFS على ويكيبيديا: https://ar.wikipedia.org/wiki/إن_تي_إف_إس